Installing Silence From Above.
By Paul M. Messett / Sales & Marketing Manager
02.19.08
Almost daily I receive two or three questions about the importance of treating the roof in an automotive application. In the past I've discussed properly treating the doors and floor, now it's time to take things one step further and tackle the roof.
Why would I treat the "top of the car"?
I'm being sarcastic, there was once an MTV Cribs episode where the featured musical artist referred to the ceiling as the "top of the room". Having said that.
To reduce vibration.
One contributor to general noise nastiness is vibration and in this case the roof can vibrate tremendously. Mobile audio subwoofer systems can create enough pressure within the "tin can" to cause the sheet metal to modulate heavily. There are a few benefits to using a vibration damping sheet on the underside of the roof and they are. 1. Limit the conversion of sound energy into mechanical energy (increase SPL)
2. Reduce impact noise onto the surface (rain)
3. Dramatically reduced installation time
The roof is prone to greater modulation than any other part of the vehicle because it is a larger panel with minimal structural support.
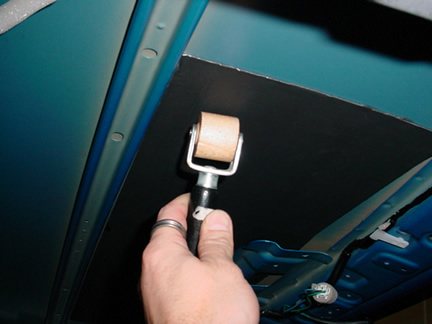
The ideal product for this application is VMAX, a lightweight peel and stick vibration damping sheet. VMAX consists of a thin layer of butyl rubber bonded to a 4 mil thick, black anodized aluminum layer. The product will bond to just about anything and can be removed and repositioned easily if necessary. I suggest using one to two layers maximum on the underside of the roof. To further enhance the damping performance, apply a final piece of VMAX roughly 50 to 70% the size of the base layer and place this piece on top and in the center of the base layer. This will help to damp across a greater bandwidth of frequencies and maximize the effect of the damping system. If you need more than two layers here then you should consider structural reinforcement as a means of eliminating vibration.
Do not be caught up in the idea of using a damping sheet as a thermal control material in this application. The aluminum layer is more effective at limiting the bending of a panel than anything else. If it were a thermal control material don't you think you would want to direct the aluminum layer toward the heat source?
And finally, be wary of spraying a vibration damping compound onto the underside of a roof. Liquids like to atomize and get into and onto things they should not be. Also, liquids will run and drip turning your project into a mess. The idea is to get in and get out quickly, and you can't do that if you have the headliner down for days to make sure the liquid is cured properly. With sheet materials, the damping is instantaneous.
VMAX technical data sheet:
http://www.cascadeaudio.com/car_noise_control/pdf/VMAX_Tech.pdf
VMAX on the under side of the roof.
To eliminate airflow noise.
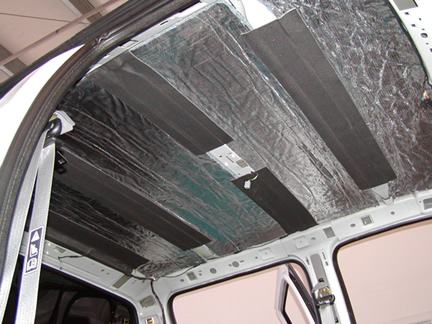
The most common form of noise that enters the passenger compartment through the roof is upper mid band and high frequency airflow noise. Airflow noise is generally not as intense as road noise and for the most part does not include the low frequency drone that you would experience radiating through an untreated floor pan. This means that we do not have to apply dense barrier materials to properly defeat this type of noise. Rather, one layer of Insulator 12 is all that is required to effectively treat the roof. The Insulator 12 product works well to absorb the range of airborne sound most commonly found in this area of the vehicle. Insulator 12 is also lightweight and easily installed with either quality, spray adhesive or aluminum tape. I prefer to use them both to ensure a good bond to the sheet metal surface. Another benefit of using the Insulator 12 product is the inclusion of 2 aluminum mylar layers. Installing this product will reflect thermal energy keeping your vehicle nice and cool in the summer and toasty warm in the winter.
Insulator 12 technical data sheet:
http://www.cascadeaudio.com/car_noise_control/pdf/Insulator_Tech.pdf
Insulator 12 installed in a Subaru STI
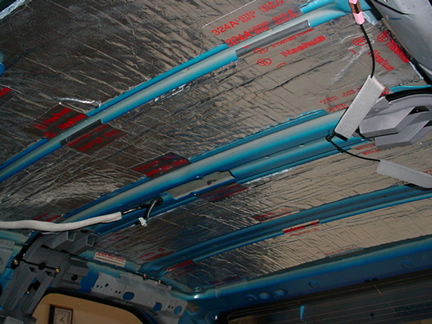
Insulator 12 installed in a Ford F350
To reflect thermal energy.
Not everyone is concerned about vibration damping or eliminating airflow noise, some just want to maintain a thermally comfortable environment. If this is what you're after, and sound control materials don't appeal to you at all, then consider using a thermal control liquid. We offer three types and they are.
1. TG-1: A white, latex based emulsion loaded with glass microspheres.
2. TGT-1: A translucent, high temperature, high yield, sprayable emulsion that reflects thermal energy with extremely thin film thickness.
3. TGT-HT-1: A translucent, very high temperature, high yield, sprayable emulsion that reflects thermal energy with extremely thin film thickness.
These types of thermal control compounds are great for use on the underside of the roof, on the floor pan over exhaust components and on the firewall. These materials are also commonly used in a variety commercial and residential applications.
TG-1 technical data sheet:
http://www.cascadeaudio.com/car_noise_control/pdf/TG-1_Tech.pdf
TGT-1 & TGT-HT-1 technical data sheet:
http://www.cascadeaudio.com/car_noise_control/pdf/TGT-1_TGT-HT-1_tech.pdf
TG-1 on the underside of a roof (41 Willy's).

Don't fear the headliner, show it who's boss.
So many people choose not to treat the roof for one simple reason and that is because they are not confident in their ability to take down the headliner. This, for the most part, is quite easy to do if the headliner in question is made of a compressed material that has been formed into shape. Removal of most headliners requires the following steps.
1. Don't worry about having to pull the headliner out of the vehicle. Just lower it to access the underside of the roof.
2. Remove front sail panels, side pillar panels and rear sail panels. Some vehicles may have additional panels to remove (i.e. suv's and wagons)
3. Remove dome light assemblies, overhead console assemblies, sun visors, hangar tabs, seat belt assembly mounts and any miscellaneous fasteners supporting the headliner to a structural rib.
4. Be sure to disconnect all wiring harnesses. NOTE: Do not disconnect anything wrapped in yellow loom or yellow tape unless the positive battery terminal is disconnected first. If you fail to disconnect power with a yellow harness disconnected and should happen to turn the ignition setting to acc or on, you will activate an airbag light in the instrument cluster!
5. Lower the headliner onto the top of the seats, dash and rear package tray (if applicable).
6. Work from the center to the outside edges.
If you have a vehicle that does not have a formed headliner and instead has a cloth or vinyl headliner, my suggestion would be to consult with a professional upholsterer first to determine exactly what steps are required to remove the headliner properly. These headliners may require removal of a rear window (i.e. older Toyota trucks) to remove the liner.
The final battle.or the first of many!
The roof is in many cases the last area of the vehicle to be treated or at least that is how we position it when suggesting a sound control system be done in stages. When we specify a materials list for an automotive application, we always suggest treating the roof to make sure the noise floor is ultimately as low as possible. When discussing the passenger compartment, the process is followed in this order, the floor, then the doors and finally the roof. Most people do not do the entire sound control system in one shot, rather it is done in these three stages. Treating the roof will help to reduce the noise floor and help to maintain a cooler more comfortable environment.
The roof really is not very difficult to do at all. In fact, if I'm doing an entire sound control system over the course of a few days, which includes removing the entire interior in one shot, the roof is the first thing I'll do. This way I can get it done and out of the way. Install a roof treatment in your vehicle and you will be glad you did.
Good luck with your install!
Paul M. Messett
Cascade Audio Engineering
Sales & Marketing Manager
<< back |